Hi everyone! I hope you're enjoying Photographer's Week so far! Today, I'm going to show you some tips I figured out about editing with
Picasa.
So, a while ago I was trying to access picasa web albums, but stumbled across the program picasa, which you download onto your computer. I thought it looked interesting enough, so I downloaded it. I ignored it for a good many months, but just a few days ago rediscovered it. I wanted to get an effective black and white photo, so when fiddling with the controls, I came up with a black and white look that really really works!
For this tutorial, I'm borrowing two photos from fix-it-friday on iheartfaces which came up a few weeks ago.
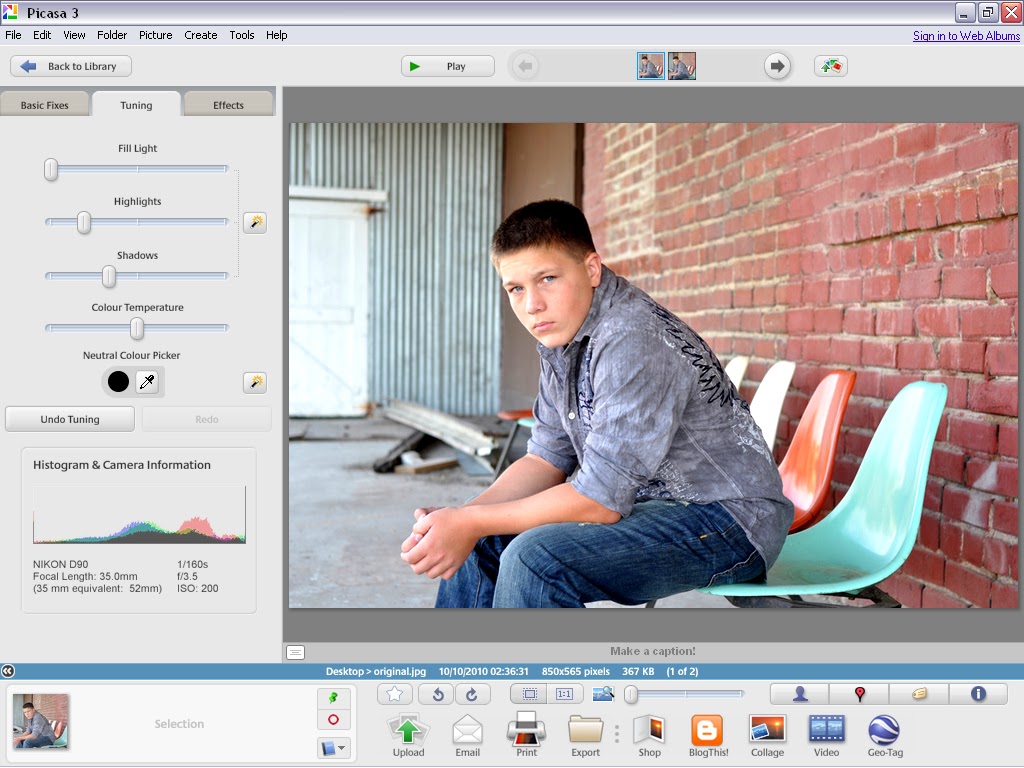
So, I took this photo from iheartfaces as I said before. Now in this tutorial I'm going to make the picture a nice black and white. So the first thing I always do is go onto the 'Tuning' button and raise the highlights feature up a bit.
Then, do the same with the 'Shadows' button, but make the setting higher than the 'highlights' one. Don't do anything with the 'fill light' button unless the photo is really really dark!
Then it's time to go to the black and white effect. At first you may not think it's wildly better than just using the black and white effect in the first place, but for me it adds more dimension to the picture.
See, this is what the picture would look like if I had just pressed 'black and white' without tuning it. It's got much less depth, and it doesn't draw you in so well!
I'll also show you the same thing, except this time I'll use a different photo from iheartfaces - just to show you that the effect works universally!
So, here's the original, but it's a little dark. Even though it's dark, we still are going to go through the same process as above.
We change the highlights.
Then the shadows. You could leave it like that if you wanted, because it's got nice vibrant colours!
Then black and white-ified. I really do think it's pretty like this! I love the depth <3
Again, this is what it would look like if I hadn't changed the tuning. I think there's quite a big difference!
Now, I'm going to mess with a bit of colour. (Original photo again)
It's all well and fine if you're going to just change it to sepia or tint it, but I am a sucker for tuning!
This time I added fill light as well and went a little more wild with what thing went where.
I also changed the tone to give her a 'healthy tan', even though she's perfect as is, I thought it would be nice to change tones - not just to give her a 'healthy tan'.
If you can't read it it says: 'See, it's quite simple. Picasa is an easy editing software, even though it may not give you 'professional' results it's good enough. And no, I was not payed to say this! :)' also, it's free, which is a plus!
I also find it fun to give the photo a 'blown out' effect, again, tuning is key!
I hope you enjoyed these tips :)


2 comments:
Great tips! Is this Picasa 3 or Picasa 3.8?
Lena, this tutorial is for whatever version is currently up for grabs. I just downloaded it recently, so I think 3.8, but it's possibly 3. I'm sure they can't be too different from each other!
Love,
Maeve
Post a Comment